Magento
Introduction
Our Magento plug-in comes with regular updates and full integration support, offering a versatile out-of-the-box solution to accept online payments easily:
- Supports the following integration modes:
- Hosted Checkout Page: Redirect your customers to the Direct to with any of our available payment methods.
- Hosted Tokenization Page: Include an iFrame in your checkout page for card payments.
- Redirect Payments: Allow your customers to chose their preferred payment method directly on your checkout page by introducing single payment buttons.
- Offers the following payment methods on our platform:
Alipay+
American Express
Apple Pay
Bancontact
Bizum
Carte Bancaire
Cpay
Diners Club
Google Pay
iDEAL
Illicado
Intersolve
JCB
Maestro
MasterCard
Multibanco
PayPal
Visa
WeChatPay
Keep an eye on our Release Notes to stay informed about updates and new features (i.e. payment methods, features, integration modes) we have added to this plugin!
Check out our documentation to learn how to link your store with our platform to profit from all these features!
GitHub repositoryMarketplace repository
To process transactions with this plugin, you need an account on our platform.
This plugin works with both our test and live environment. A test account is a great way to get familiar with both the plugin and our platform. Once you want to go live, create a production account or contact us!
Install plugin
The first step to use the plugin is the installation process. Before you proceed, make sure your infrastructure meets these system requirements:
| Item | Description |
|---|---|
| Plugin package | |
| Direct credentials |
|
| Magento |
Compatible with PHP 8.1+ Compatible with Magento versions v2.4.4-p2 and v2.4.5-p1 Find an extensive overview about the compatibilities on the Magento support site |
| PHP |
PHP version 8.1+ |
| PCI compliancy |
SAQ A |
Once done, check out the dedicated chapters to either
Install complete plugin
Choose one of the installation modes to install the complete plugin:
Install from Adobe Marketplace (recommended)
Follow these steps as explained in the Adobe tutorial:
- Go to the marketplace login (or register) and download the extension.
- Specify the authentication keys.
- Execute the composer command to install the packages:
composer require worldline/module-magento-payment
This command installs the following solutions:
Hosted Tokenization Page (Credit Card)
Hosted Checkout Page (Hosted Checkout)
Single payment buttons (Redirect Payments) - Execute magento commands to complete the installation:
bin/magento setup:upgrade
bin/magento setup:di:compile
bin/magento setup:static-content:deploy
Install from GitHub
Follow these steps:
- Specify repositories
composer config repositories.worldline/module-magento-payment git https://github.com/wl-online-payments-direct/plugin-magento.git composer config repositories.worldline/module-magento-payment-core git https://github.com/wl-online-payments-direct/plugin-magento-core.git composer config repositories.worldline/module-magento-payment-hostedcheckout git https://github.com/wl-online-payments-direct/plugin-magento- hostedcheckout.git composer config repositories.worldline/module-magento-payment-redirectpayment git https://github.com/wl-online-payments-direct/plugin-magento-redirect- payments.git composer config repositories.worldline/module-magento-payment-creditcard git https://github.com/wl-online-payments-direct/plugin-magento-creditcard.git composer config repositories.worldline/module-magento-payment-graph-ql git git@github.com:wl-online-payments-direct/plugin-magento-graph-ql.git - Execute the composer command to install the packages:
composer require worldline/module-magento-payment
This command installs the following solutions:
Hosted Tokenization Page (Credit Card)
Hosted Checkout Page (Hosted Checkout)
Single payment buttons (Redirect Payments) - Execute magento commands to complete installation:
bin/magento setup:upgradebin/magento setup:di:compilebin/magento setup:static-content:deploy
Install specific payment solution
The architecture of our plugin also allows you to install any desired the payment solution instead of the complete plugin. This enables you i.e. to only install "Hosted Checkout" and pass on the "Credit Card" integration.
Instead of executing the command for the full installation via either Adobe Marketplace or GitHub, modify it accordingly:
| Desired version | Executable command |
|---|---|
| "Credit Card" payment solution |
|
| "Hosted Checkout" payment solution |
|
| "Redirect (single button)" payment solution |
|
| worldline/module-magento-payment-graph-ql |
|
Install Amasty Recurring Payments module
- Buy the extension from the Amasty marketplace.
- Set up the keys following Amasty guide.
Execute the following command. The given path is a full server path of the folder containing the package with the extension:
composer require worldline/module-magento-recurring-payments
Read our dedicated chapter with detailed instructions for installing the module.
Install Hyvä Theme
- Buy the extension from Hyvä.
- Execute the following command. The given path is a full server path of the folder containing the package with the extension:
composer config repositories.worldline/module-magento-theme-hyva git
git@github.com:wl-online-payments-direct/plugin-magento-hyva.git
Read our dedicated chapter with detailed instructions for installing the module. - Execute the composer command to install the package.
composer require worldline/module-magento-theme-hyva
This command installs the following solutions:
Credit card
Hosted checkout
Redirect (single button) payments
Hyva module for the Worldline solutions - Execute Magento commands to complete the installation.
bin/magento setup:upgrade
bin/magento setup:di:compile
bin/magento setup:static-content:deploy
Update plugin
Depending on whether you have installed the complete plugin or only a specific payment solutions, the executable command differs:
| Version installed | Executable command |
|---|---|
| worldline/module-magento-payment |
|
| worldline/module-magento-payment-credit-card |
|
| worldline/module-magento-payment-hosted-checkout |
|
| worldline/module-magento-payment-redirect-payment |
|
Uninstall plugin
We strongly advise to create a DB dump before executing this action.
To uninstall the plugin with all the related data, execute the following command:
composer remove worldline/module-magento-payment
Alternatively, you can use the following command:
composer remove worldline/module-magento-payment \
worldline/module-magento-payment-core \
worldline/module-magento-payment-credit-card \
worldline/module-magento-payment-hosted-checkout \
worldline/module-magento-payment-redirect-payment \
worldline/module-magento-recurring-payments \
worldline/module-magento-payment-graph-ql
To remove extensions with their related data, please use the following command:
bin/magento module:uninstall \
Worldline_Payment \
Worldline_PaymentCore \
Worldline_CreditCard \
Worldline_HostedCheckout \
Worldline_RedirectPayment \
Worldline_GraphQl
To remove the plugin with all their related data, execute the following commands instead:
bin/magento module:uninstall \
Worldline_Payment \
Worldline_PaymentCore \
Worldline_CreditCard \
Worldline_HostedCheckout \
Worldline_RedirectPayment \
Worldline_RecurringPayments
If the recurring add-on has been installed, execute the following command:
composer remove worldline/module-magento-recurring-paymentsConfigure plugin
After the installation, you need to configure the plugin to link your store to our platform.
Configure connection
- Login to the Adobe commerce/Magento Back Office. Go to Stores > WORLDLINE ONLINE PAYMENTS > Connection.
- In Connection, configure the following settings:
Property Description/Actions Environment mode Select between "Test" or "Production" to link your shop to the respective environment. Depending on your selection, the shop module will send the transaction requests to the test or production environment.
Make sure to:
- Not to mix up credential from "Test" with Production" and vice versa when configuring fields Merchant ID (PSPID)/API Key/API Secret and webhooks credentials.
- To switch to "Production" as soon as you have finalised your tests.
API Key Enter the API Key of your test or live PSPID. Read our dedicated guide to learn how to generate one.
API Secret Enter the API Secret of your test or live PSPID. Read our dedicated guide to learn how to generate one.
Merchant ID (PSPID) Enter your PSPID from our platform that you want to use for transaction processing.
For some properties, Magento allows you to use the default value defined on the system level. If you want to do this, flag “Use system value” accordingly.
- Click on "Save Config" to confirm your configuration.
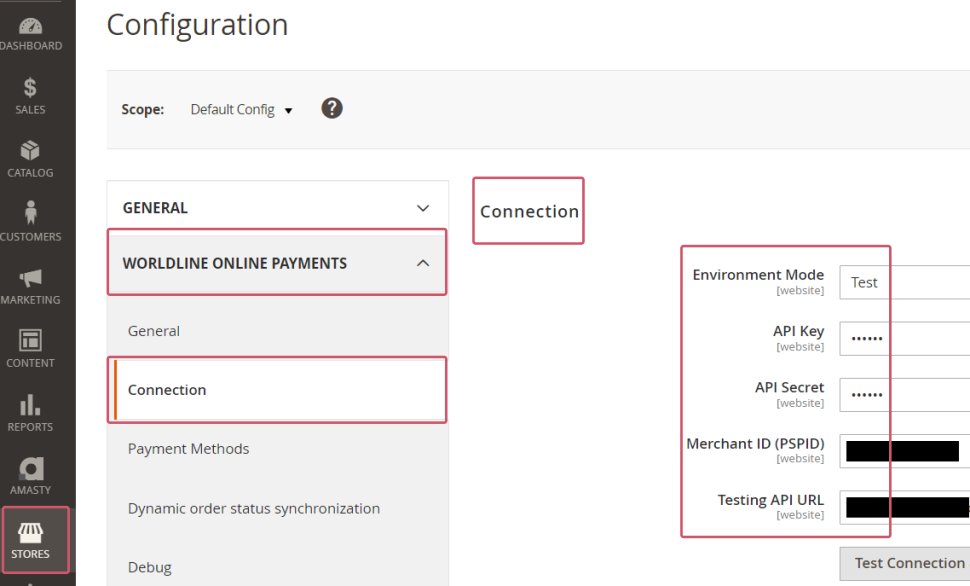
Once you have filled in the table, verify the configuration by establishing a test connection between the plugin and our platform. Click on the "Test Connection" button. Check that the button text changes to "Successful! Test again". If the button text changes to "Connection failed! Test again?", contact your system administrator for troubleshooting to check:
- You are using the correct credentials
- Whether your PSPID is active
- You send the request to the correct PSPID/environment (Test vs Production)
Configure webhooks
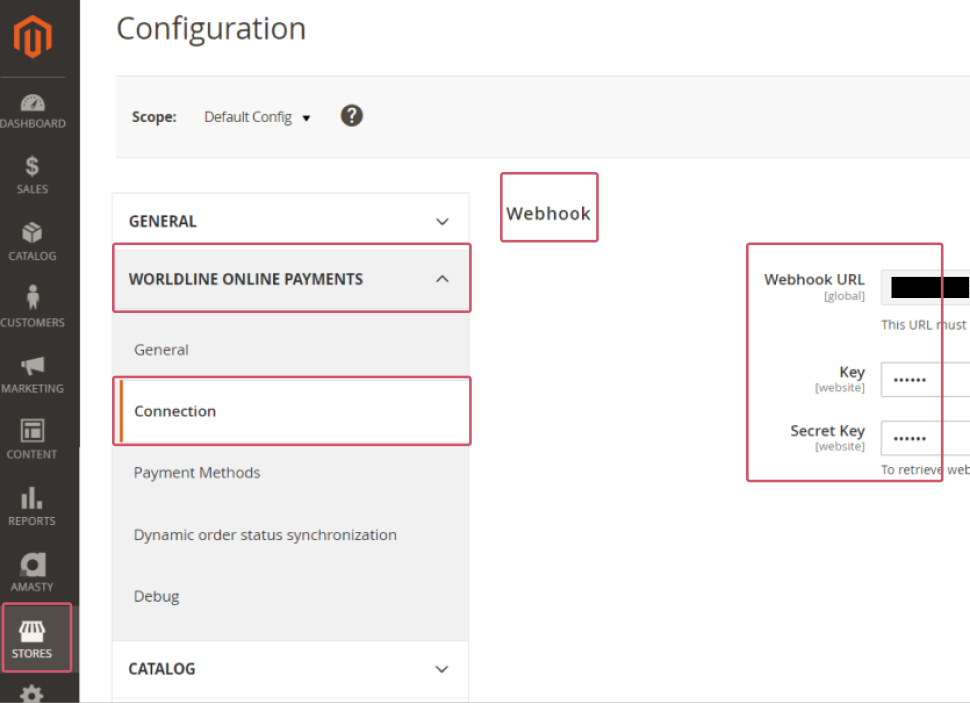
- Login to the Adobe commerce/Magento Back Office. Go to Stores > WORLDLINE ONLINE PAYMENTS > Connection.
- In Webhooks, configure the following settings:
Property Description/Actions Allow Receiving Webhooks Select "Yes" to receive webhooks in the Magento server. Webhook URL Copy this URL into the Endpoint URLs fields in the Direct Merchant Portal as described in our dedicated guide. Key Enter the API key of your test or live PSPID. Read our dedicated guide to learn how to generate one. Secret Key Enter the API secret of your test or live PSPID. Read our dedicated guide to learn how to generate one.
For some properties, Magento allows you to use the default value defined on the system level. If you want to do this, flag "Use system value" accordingly.
- Click on "Save Config" to confirm and clean your cache.
Configure payment methods
- Login to the Adobe commerce/Magento Back Office. Go to Stores > WORLDLINE ONLINE PAYMENTS > Payment methods.
- As the plugin supports Hosted Checkout Page (Hosted Checkout), Hosted Tokenization Page (Credit Card) and Single payment buttons (Redirect Payments), you can customise your customers’ payment experience by selecting payment methods for either mode and even use both flows together.
- Mind that card payments are available for both modes, whereas alternative payment methods are available only for Hosted Checkout Page and Single payment buttons.

- In "Credit Card", configure the following settings for transactions processed via our Hosted Tokenization Page.
Property Description/Actions Enable Module Select one of the options to for processing credit card payments:
- "Yes": The module processes card payments via Hosted Tokenization Page integration mode. Any non-card payments go via Hosted Checkout Page as configured in "Hosted Checkout".
- "No": Instead of using Hosted Tokenization Page for card payments, all payment methods are offered via Hosted Checkout Page as configured in "Hosted Checkout".
Title Customise the payment button text in the iframe on the Magento checkout page. HTML Template ID Enter the file name of your template to adapt our payment page to the look and feel of your shop. To learn how to create templates, see our dedicated chapters in the Hosted Tokenization Page guide. Payment Action Define whether to process the transactions as authorisation mode or as direct sale. Select one of the following options:
- "Authorize & Capture": The amount has been ordered to be paid out in one go. Use this mode to receive the money before shipping the order There are no further actions required to capture the transaction. Successful transactions will have status="CAPTURED" / statusOutput.statusCategory="COMPLETED" / statusOutput.statusCode=9
- "Authorized (Authorization Only)": The amount is only blocked on your customer's card. Successful transactions will have status="PENDING_CAPTURE" / statusOutput.statusCategory="PENDING_MERCHANT" / statusOutput.statusCode=5 (Use this mode when you wish to capture a transaction only after shipping the order).
If "Payment Action" is set to "Authorized (Authorization Only)", beware of the following
- Make sure that you capture authorised transaction later. Only then will the transaction have status="CAPTURED" / statusOutput.statusCategory="COMPLETED" / statusOutput.statusCode=9, for which you receive the actual payment for the transaction.
- Capture transaction in the Magento Back Office via the "Order" module.
Skip 3DSecure Authentication Select "Yes" or "No" to deactivate the 3-D Secure authentication process for payments.
We strongly recommend selecting "No" as 3-D Secure is mandatory in some markets. This will also ensure liability shift for transactions with successful 3-D Secure authentication. If you select "Yes" and choose to process non 3-D Secure transactions you may not benefit from liability shift and may be held liable.
Trigger an authentication for every payment Select "Yes" if you want the issuer to request a SCA (strong customer authentication) for payments.
Request 3DS exemption Some markets allow you to potentially exempt your customers from a 3-D Secure check.
Select "Yes" if you would like your customers to be potentially exempted. This applies only to transactions with a basket less than 30 EUR.
Sort Define the sort order of the iFrame. This allows you to decide in which order the different payment means are displayed on your checkout page.
Filtering You can also implement various filters to define when to propose this way of processing payments to your customers: countries, currencies, amounts.
- "Yes": The module processes card payments via Hosted Tokenization Page integration mode. Any non-card payments go via Hosted Checkout Page as configured in "Hosted Checkout".
- In "Hosted Checkout", configure the following settings for transactions processed via our Hosted Checkout Page
Property Description/Actions Enable Module Select one of the options to for processing all payments
- "Yes": The module processes both card and non-card payment methods via Hosted Checkout Page mode.
- "No": The module processes only card payments via Hosted Tokenization Page integration mode.
If you select "No", make sure "Enable Module" in the "Credit Card" module is set to "Yes" to ensure at least card payment methods are possible.
Title Customise the heading on the Hosted Checkout Page HTML Template ID Enter the file name of your template to adapt our payment page to the look and feel of your shop. To learn how to create templates, see our dedicated chapters in the Hosted Checkout Page guide. Payment Action Define whether to process the transactions as authorisation mode or as direct sale. Select one of the following options:
- "Authorize & Capture": The amount has been ordered to be paid out in one go. Use this mode to receive the money before shipping the order There are no further actions required to capture the transaction. Successful transactions will have status="CAPTURED" / statusOutput.statusCategory="COMPLETED" / statusOutput.statusCode=9
- "Authorized (Authorization Only)": The amount is only blocked on your customer's card. Successful transactions will have status="PENDING_CAPTURE" / statusOutput.statusCategory="PENDING_MERCHANT" / statusOutput.statusCode=5 (Use this mode when you wish to capture a transaction only after shipping the order).
If "Payment Action" is set to "Authorized (Authorization Only)", beware of the following
- Make sure that you capture authorised transaction later. Only then will the transaction have status="CAPTURED" / statusOutput.statusCategory="COMPLETED" / statusOutput.statusCode=9, for which you receive the actual payment for the transaction.
- Capture transaction in the Magento Back Office via the "Order" module.
Skip 3DSecure Authentication Select "Yes" or "No" to deactivate the 3-D Secure authentication process for payments.
We strongly recommend selecting "No" as 3-D Secure is mandatory in some markets. This will also ensure liability shift for transactions with successful 3-D Secure authentication. If you select "Yes" and choose to process non 3-D Secure transactions you may not benefit from liability shift and may be held liable.
Trigger an authentication for every payment Select "Yes" if you want the issuer to request a SCA (strong customer authentication) for payments.
Request 3DS exemption Some markets allow you to potentially exempt your customers from a 3-D Secure check.
Select "Yes" if you would like your customers to be potentially exempted. This applies only to transactions with a basket less than 30 EUR.
Sort Define the sort order of the iFrame. This allows you to decide in which order the different payment means are displayed on your checkout page.
Group Cards Group all cards payment methods under one single button on the Hosted Checkout Page.
Submit Customer Cart Items Data to Worldline Defines whether you wish to submit your customer cart details to Direct. Doing so will improve customer experience, but might generate errors in case you use custom tax rules.
Filtering You can also implement various filters to define when to propose this way of processing payments to your customers: countries, currencies, amounts.
Process Mealvouchers Select "Yes" to be able to process Mealvouchers payment method and configure the different product types you need:
- Food and Drink
- Gift and Flowers
- Home and Garden
- "Yes": The module processes both card and non-card payment methods via Hosted Checkout Page mode.
For some properties, Magento allows you to use the default value defined on the system level. If you want to do this, flag “Use system value” accordingly.
- In "Redirect Payment", configure the following settings for transactions for which your customers preselect their preferred payment method before the redirection to our Hosted Checkout Page.
You can enable each payment method separately by configuring for each of them the following:Property Description/Actions Enable Module Select one of the options to for processing all payments
- "Yes": The module processes both card and non-card payment methods via Hosted Checkout Page mode.
- "No": The module processes only card payments via Hosted Tokenization Page integration mode.
If you select "No", make sure "Enable Module" in the "Credit Card" module is set to "Yes" to ensure at least card payment methods are possible.
Title Customise the heading on the Hosted Checkout Page.
HTML Template ID Enter the file name of your template to adapt our payment page to the look and feel of your shop. To learn how to create templates, see our dedicated chapters in the Hosted Checkout Page guide.
Payment Action Define whether to process the transactions as authorisation mode or as direct sale. Select one of the following options:
- "Authorize & Capture": The amount has been ordered to be paid out in one go. Use this mode to receive the money before shipping the order There are no further actions required to capture the transaction. Successful transactions will have status="CAPTURED" / statusOutput.statusCategory="COMPLETED" /statusOutput.statusCode=9
- "Authorized (Authorization Only)": The amount is only blocked on your customer's card. Successful transactions will have status="PENDING_CAPTURE" / statusOutput.statusCategory="PENDING_MERCHANT" /statusOutput.statusCode=5 (Use this mode when you wish to capture a transaction only after shipping the order).
If "Payment Action" is set to "Authorized (Authorization Only)", beware of the following:
- Make sure that you capture authorised transaction later. Only then will the transaction have status="CAPTURED" / statusOutput.statusCategory="COMPLETED" /statusOutput.statusCode=9, for which you receive the actual payment for the transaction.
- Capture transaction in the Magento Back Office via the "Order" module.
Skip 3DSecure Authentication Select "Yes" or "No" to deactivate the 3-D Secure authentication process for payments.
We strongly recommend selecting "No" as 3-D Secure is mandatory in some markets. This will also ensure liability shift for transactions with successful 3-D Secure authentication. If you select "Yes" and choose to process non 3-D Secure transactions you may not benefit from liability shift and may be held liable.
Trigger an authentication for every payment Select "Yes" if you want the issuer to request a SCA (strong customer authentication) for payments.
Request 3DS exemption Some markets allow you to potentially exempt your customers from a 3-D Secure check.
Select "Yes" if you would like your customers to be potentially exempted. This applies only to transactions with a basket less than 30 EUR.
Submit Customer Cart Items Data to Worldline Defines whether you wish to submit your customer cart details to Direct. Doing so will improve customer experience, but might generate errors in case you use custom tax rules.
Sort Define the sort order of the iFrame. This allows you to decide in which order the different payment means are displayed on your checkout page
Property Description/Actions Enable Module Select one of the options to for processing all payments
- "Yes": The module processes both card and non-card payment methods via Hosted Tokenization Page mode.
- "No": The module processes only card payments via Hosted Checkout Page integration mode.
If you select "No", make sure "Enable Module" in the "Credit Card" module is set to "Yes" to ensure at least card payment methods are possible.
Sort Define the sort order of the iFrame. This allows you to decide in which order the different payment means are displayed on your checkout page.
Title Customise the heading on the Hosted Checkout Page.
- "Yes": The module processes both card and non-card payment methods via Hosted Checkout Page mode.
- Click on "Save Config" to confirm.
Manage payments
We have designed the plugin to follow-up on your orders automatically and autonomously, freeing you from the administration involved. Learn here how to use our plugin effectively which could help your business to thrive!
Update order status
The module relies on two different mechanisms to ensure your database mirrors the status of the transactions on our platform:
- Webhooks: Our platform sends notifications to the module for any transaction status update. Read the dedicated chapter to configure webhooks.
- GET calls: Magento proactively sends requests to our platform to receive the transaction’s status if the webhooks fail.
The process works as follows: Once a customer has placed an order, our platform triggers a webhook:
- If the webhook reaches Magento right away, the plugin creates an order and redirects your customers to the "Order confirmation" page.
- If Magento does not process the webhook right away, the plugin redirects your customers to the "Waiting" page. Magento will listen for another 15 seconds for incoming webhooks. As soon as the webhook reaches Magento, the plugin redirects your customers to the "Order confirmation" page.
- If the webhook does not reach Magento within these 15 seconds, two processes take over:
- 1. The plugin triggers a first GET call to fetch the transaction status directly from our platform.
- 2. If the plugin does not receive feedback, a cronjob takes over and will trigger GET calls at regular intervals to update the order accordingly.
To configure the GET calls, follow these steps:
- Login to the Adobe commerce/Magento Back Office. Go to Stores > WORLDLINE ONLINE PAYMENTS > Order status updater.
- In General, configure the following settings:
Property Description/Actions Fallback Timeout Defines the period (in minutes) after the module sends GET calls if webhooks fail. After this period, the module will send calls once every minute. Fallback Timeout Limit Defines the period (in hours) during which the module sends GET calls. The default period (3 hours) corresponds to the session validity of a CreateHostedCheckout / CreateHostedTokenizationSession. Schedule (Cron Syntax) Synthax to use to run the process. - Click on "Save Config" to confirm your configuration.
Perform test transactions
Use our platform's test environment to make sure your plugin works as intended. We offer test data sets on our dedicated Test cases page. Target our test environment as described in the "Configure Plugin" section.
Make sure to switch to the LIVE environment as soon as you have finalised your tests.
Debug
Each payment method allows you to enable a debug mode (which is by default deactivated). When activated, Magento creates additional logs of all the request by the plugin sent to the Worldline platform which you can retrieve.
To access the logs, log in to the Adobe commerce / Magento admin panel. Go to “Stores > Settings > Configuration > WORLDLINE > Debug”. By scrolling to the debug section, you will be able to perform some actions in the following modules:
- "General": Define for how long those logs needs to be kept.
- "Debug Logs": Download the log file or delete it.
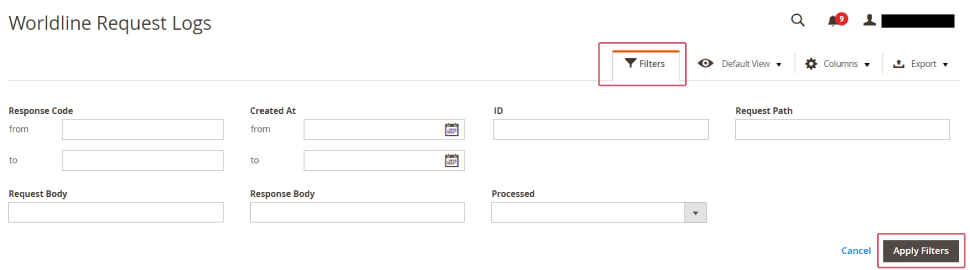
- "Wordline Request Logs" Access a grid that will allow you to filter the logs you wish to see. You can for instance filter on HTTP status codes, on the API's used, on specific dates or on the content of the request/response.
You will also be able to request your systems to log all incoming webhooks and display them into a similar grid as by request
Mind that:
- You need to set the "Log webhooks" on "Yes" to log webhooks.
- The time we will keep the logs of the webhooks is equal to the time we log the requests.
Configure Amasty Recurring Payments
Our Magento plugin also features the Amasty Recurring Payments module. It allows you to process recurring payments and subscriptions and thus empowers you to:
- Pre-define or customize subscriptions
- Create free trials, discounts and free delivery
- Create mixed baskets
- Make products available only through subscriptions
- Send notification emails to manage failed payments
This solution completely adheres to our security standards, outsourcing the management of any sensitive credit cards details.
Read our dedicated chapter with detailed instructions for installing the module.
We have developed our plugin with specific consideration of SCA regulations. You will never have to manage sensitive data, as we take care of that. This also enables you to ensure a smooth payment experience by making a clear distinction between CIT and MIT.
Configure module
This plugin works in combination with the regular Worldline Online Payments Magento module as described in the previous chapters. All configurations for Hosted Checkout, Credit Card or Redirect Payments will also work via subscription.
If you have configured "Hosted Checkout", "Credit Card" or "Redirect Payment" in two steps ("Authorise" mode), the plugin overrides this with "Authorize and capture" mode. However, it remains valid for regular payments. The plugin will process mixed baskets (Subscriptions & Single Payments) in "Authorize and capture" mode.
To configure the extension, follow these steps:
- Go to Stores > Configuration > Amasty extensions > Subscriptions & Recurring Payment.
- In "General", configure the following settings:
Property Description/Actions Supported Payment Gateways Select the checkout options you wish to propose to your customers for subscription processing. Allow for Specifying Subscription and End YES: Enable this option to offer your customers to choose the subscription start and end date.
NO: Process a subscription of indefinite length until cancellation.
Apply Free Shipping to Subscription Products YES: Automatically set the shipping price to free to maximise customer fidelity and engagement.
NO: Apply she shipping fee you have configured in Magento.
Enable "Next Billing Date" Explanation Tooltip YES/NO: Define whether to make a ? icon appear with the tooltip in the subscriptions grid on the customers' Storefront. Only available if you have several websites in different time zones. Message Text Text displayed in the textbox to the customers. - In "Global Subscription Settings", define whether the products should be used only in the context of subscription and the frequency of the payments.
Property Description/Actions Subscription only YES: Sell your products through regular purchases or only through subscriptions.
NO: Sell your products either as on-off transactions or as subscriptions.Subscription Plans Available to Customers Define the frequencies you wish to propose to your customers for their subscription. You can:
Select the default values (Daily, Weekly, Monthly, Annual)
Modify the default values
Create your own custom plans
You can add multiple subscription plans in Sales > Amasty > Subscriptions > Subscription Plans. On the "Subscription Plans" grid, you can manage the existing plans and add new plans as per your business needs.
- In "Labels & Comments", customise the text displayed when your customers want to add products to the cart
Property Description/Actions Label for the Single Purchase option Text shown on the storefront when your customers want to add a product to the basket as a single purchase. Label for the Recurring Purchase option Text shown on the storefront when your customers want to add a product on the basket as a subscription. - In "Email Notifications", configure
Property Description/Actions Send Email as Choose a sender via Stores > Configuration > General > Store email addresses. Notify Customers When Subscription is Purchased Inform your customers via email when they have bought a subscription from your website. Email Template Choose the email template to contact your customers. Notify Customers When Trial Period Ends Inform your customers about the end of a free trial period and the next occurrence when they will be billed. Notify Customers When Subscription is Cancelled Send a confirmation e-mail to your customers when their subscription has been cancelled.
Create and edit subscription plans
The extension allows you to create and customise an unlimited number of custom subscription plans according to your needs with unique features.
To do so, go to Sales > Amasty Subscriptions > Subscription Plans > Subscriptions Plans. Our extension offers the following 4 default plans:
- Daily
- Weekly
- Monthly
- Annual
You can either:
- Edit these plans
- Create your own plans to match your needs
To edit an existing plan, click Edit in the action column. Click on 'Add New Plan' to display the "Plan Settings" page with the following properties:
| Property | Description/Actions |
|---|---|
| Subscription Plan Name | Define the name of your subscription (not visible for your customers). |
| Status | Define the status of your subscription. (Default value: "Suspended"). |
| Billing Frequency | Define the amount of *units* after you charge your customers. |
| Billing Frequency Unit | Define the billing interval (day, week, month or year). |
| Enable Free Trials | Enable/Disable the option to offer a free trial to your customers. |
| Charge Initial fee | Charge an initial fee. Choose between a fixed cost or a percentage of the product price. |
| Offer Discounted Prices to Subscribers |
YES: Offer discounts against the price your customers pay for a single purchase. Choose between a fixed discount or a percentage of the product price and define how many times to apply it. NO: The price for both one-off and subscription payments remain the same. |
Configure subscription products
To propose subscription to your customers, you need to decide which products to propose. To do so, perform the following steps:
- Go to your catalog of products via Catalog > Products.
- Select "Products" to propose your products to your customers.
- On the "Products" page, make the chosen products from the "Actions" drop-down list available through a subscription. The chosen subscription products appear in the "Subscription Product" column.
Go into the details of each product to choose between the default configuration for subscriptions or customer settings:
Propery Description/Actions Available by subscription Define whether this product:
Uses custom subscription settings
Uses default subscription settings
Is not eligible for subscriptionsSubscription only Define whether to offer this product for single purchases or through subscriptions only. Subscription Plans Available to Customers Defines the plans available to your customers.
Configure Hyvä Theme
Our Magento plugin is compatible with the Hyvä Theme. Therefore, to use our plugin with the Hyvä Theme, you need to buy it first.
This valuable extension is an asset for both you and your customers by offering:
- A new, highly customisable design for your webshop based on the familiar Luma theme.
- An efficient integration which loads only the necessary CSS, Javascript and HTML assets, speeding up your shop front-end.
Read our dedicated chapter with detailed instructions for installing the module.